Kate Spade Orchard Street Arla in Deep Indigo and Mulberry Small Bayswater Satchel in Oak with guitar style straps
With interchangeable straps being so popular at the moment, I wanted to try one on my bag, but couldn’t find one I liked – so I decided to make my own. Now, I sew quite a lot of my own clothes, so I’m reasonable good with a sewing machine, but this is so straightforward anyone can have a go, and you could hand sew this, if you don’t have a machine. It took me about 15 minutes to make each strap – shopping online for the bits took longer than making them. Here’s my quick walk through how to make a strap, what you’ll need, and my top tips.
You'll need
- 1.5-2m of webbing,
- the same length of jacquard type ribbon or trim,
- two dog lead type clips and
- a slide bar (optional, but it's easier than trying to get exactly the right length strap).
Tip 1 - hardware- be sure to get the right size clips, the first ones I got weren't big enough for the chunky d-rings on my SBS, so I had to order larger ones. If in doubt go for larger sized clips
I got the webbing and hardware from eBay (search for bag hardware or dog lead / lobster clips), and the jacquard ribbon from my local sewing shop (online search for jacquard or woven ribbon/trim/braid for similar). I went for cotton webbing as I prefer how that feels to nylon. You can use almost any trim, but I’d avoid anything which might get caught in the slide bar and hardware, so that rules out pom-poms. Also, avoid anything which describes itself as stretch – there are some lovely decorative elastic trims but they won’t work! I spent about £12 on each strap, so they aren't cheaper than a strap from Next, but they are unique and exactly what I wanted. Webbing and hardware (the loops for the webbing, not the clip) need to be the same size, but trim can be narrower. Both of these straps use 40mm webbing and clips. You can get smaller, but I like a wide strap, both for comfort and effect, and I carry a lot about.
Tip 2 - Differently sized trim is trickier to sew so try to avoid this if you aren't a confident sewist.
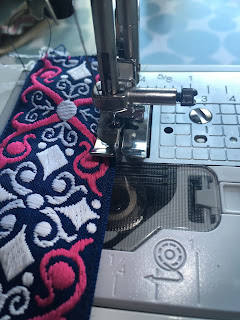
I started by sewing the trim to the webbing. Sew this as close to the edge as you can, and take your time. You’ll be securing the end later, so don’t bother back stitching. If you are handsewing, this just need to be secure, it won’t be taking any weight. I had some spray fabric glue so used this to hold the trim to the webbing while I did this, but pins work too.
Tip 4 - I also used an edge stitch foot to help get really close to the edge, a zipper foot would also work.
The strap with narrower trim was trickier, and the hardest bit was getting this trim dead centre down the whole length. I used a 1/4inch piecing foot to keep the stitches perfectly on the narrow edging on this one.
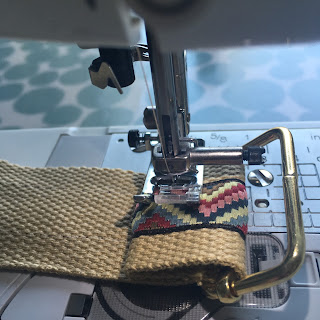
Tip 5 - Use a bag with a similar strap to help figure out the hardware. I started by sewing the slider on, then threaded the first clip on, back through the slider, and finished by sewing the second clip. Just turn the edge under once and then sew through the three layers several times.
Tip 6 - I found it easier to leave the needle down (my machine has a setting for this) and then turned the whole strap round, rather than trying to backstitch. I made sure this was very secure by doing this about five times. If handsewing this is the heaviest and trickiest bit – remember that these stiches will take the whole weight of your bag. You’ll probably need a thimble!
That’s it – adjust the length and you are done!
I am a keen sewist, knitter and crocheter, and I’m developing an alarmingly expensive taste in handbags!
(I’m wearing a Cashmerette Springfield Top in Liberty Karter Tana Lawn in pink.)
Helen Charlton


No comments:
Post a Comment